Table View
- In table view it shows the combination of data column and its associated measure column also.
- Use the table view to show results in a standard table
- . Users can navigate and drill down in the results.
- You can add totals, customize headings, and change the formula or aggregation rule for a column.
- You can also control the appearance of a column and its contents, and specify formatting to apply only if the contents of the column meet certain conditions.
Steps to Implement Table View:
Requirements for table view
- It must contain one subject Area and one or more tables.
- Must have columns to implement table view.
- One or more columns need to be there.
- May have dimension table columns or fact table columns or both.
- May have measure columns also.
Steps to follow:
1. Click new under that analysis
Newà Analysis
2. Select the subject area which we are going to use to develop reports.


3. List of tables will display under the subject area in the left side pane of “subject areas”

4. Subject area will be in the symbol  and the tables will display as folder symbol with ‘+’ symbol
 and the tables will display as folder symbol with ‘+’ symbol
5. Expand the table folder with the use of ‘+’ symbol to view the columns and double click on the columns need for the report
6. Once u double click on that it will display in the right side pane “selected columns”

7. After selecting the columns click result tab to view the result.

8. It will display the description column and id values

9. In the above screen you can see the view name as “table” which contains the selected columns.
10. By default, title view will get display.
11. The mean of title view is to say the name of the report.
12. We can alter the columns by editing the columns, by click the edit option.

13. Overall the combine view of table and title and even any other view are named as “compound layout”.
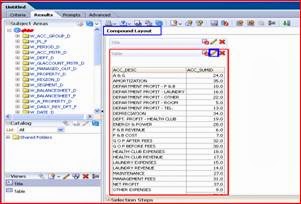
14. After click the edit option ,we have the options as two panes
Under the lower layout pane we can do changes for the columns added in the results
15. List of options in the layout pane is
A. Table Prompts
B. Sections
C. Table
D. Excluded
16. Table Prompt which is used to use the column as a list, a drop down prompt to view the values according to our selection.
17. Drag and drop any column to the table prompt you will get the display like below picture.
18. Click the drop down icon to view the account description and u can select the description,


19. ‘Sections’ are the next option to view the information in section wise without any drop down format, it will show the information as detailed and as well as paragraph wise.

20. ‘Excluded’ are the option for omitting the unwanted columns by drag and drop to the excluded section.
21. Now without using section, prompts and having the report with table as common view with coloring.
22. Reorder the column as first as values column and second followed as description.
23. By clicking the more edit option under the selected columns.


24. Format the heading of the column as per client information, and you can color out the heading with sizes , alignment, font style, borders …

25. In the edit format give the credentials, to make the heading column as good.

26. Click ok, and click done to finish the edit things , and see the result in the compoud layout.

27. As per the same, we can edit the values and description also
28. Click on the more edit options of the columns and click format values. It will display the edit format box and options to edit

29. Click in format values, and edit the value part.

30. After giving the credentials click done and view the result in the compound view.

Comments
Post a Comment