PRE-OBIEE INSTALLATION STEPS
1.For windows only, turn off DEP; otherwise, when installation completes an error message will appear stating the Java Host wasn’t installed properly. At this point, the installation will complete and all the services will start; however, when a chart is created in Answers the chart will not display.
Download and install the
following pieces of software before
installing OBIEE.
• Java Development Kit 5.0 or higher:
http://java.sun.com/javase/downloads/index.jsp
• Microsoft .NET Framework 2.0 or higher:
http://msdn2.microsoft.com/en-us/netframework/aa731542.aspx
• Web Server – IIS, Apache, Oracle Application
Server (OAS), etc.
• Database connectivity software that Oracle BI
servers use to connect to the database.
For example, if the Oracle BI Server is to access an Oracle Database,
install the Oracle 10g client.
If the Oracle BI Server is
to access MS SQL Server database,
install Microsoft Data Access Components
(MDAC).
OBIEE INSTALLATION STEPS:
1.Go to the c:\obiee files\lessons\day 1\lesson 2\obiee 10.1.3.4.0\windows\server
\oracle_business_intelligence\ folder and double-click setup.exe.
2.Select next to continue.
Installation requires 2 gb of free disk space and 200 mb of Free temp disk space.
3. Select the path to install the OBIEE files. If installing the Oracle BI Server and Oracle BI Presentation Server on separate machines, select the same drive for each location as an upcoming screen will allow you to select the server components to be installed.
Keep the defaults and click ‘Next’.
4.Choose the setup that fits your needs. This is the screen where you can select to only install the Oracle BI Server or the Oracle Presentation Services.
If you are separating the installation of the Oracle BI Server and Oracle Presentation Services, the installation process will need to be done on each server.
Review the various setup types, make sure ‘Complete’ is selected and click ‘Next’.
5. If integrating OBIEE with Oracle Business Applications select the Oracle Containers for J2EE (OC4J); otherwise, select the Web Server that has been installed on the server.
Select the IIS web server and click ‘Next
Always make sure the web server has been installed prior to the OBI installation.
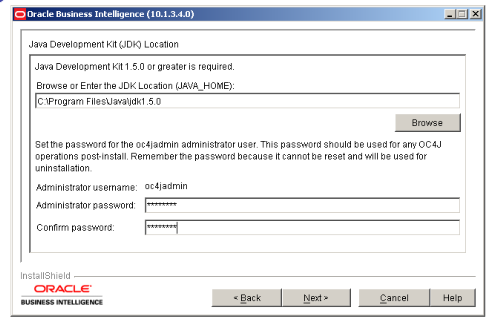
6. Select the Java C:\Program
Files\Java\jdk1.6.0_18
Enter passw0rd for the
oc4jadmin username.
The oc4jadmin password must be a minimum of 6 characters with 1
numeric character.
The oc4jadmin password is not needed after installation unless
integrating with Oracle Applications at a future date or uninstalling OBIEE.
7.In order for the minimum number of services to run upon the server restarting, the Oracle BI Server, Oracle BI Presentation Server, and Oracle BI Java Host must be set to ‘Automatic’.`
Review the options, accept the defaults and click ‘Next’.
The Account username and password will need administrator privileges to the operating system. The username and password can be changed after installation by modifying the properties of each Oracle BI service.
The Error Message Language setting will default to the operating system’s default language.
8) Click ‘Next’ at the Error Message Language screen.
9) This is the last step before installation begins…Review the screen and click ‘Next’
Installation will take approximately 30-40 minutes and you will need to restart the Windows Server.
Periodically check progress to ensure the installation has not stopped.
The percent complete bar will go to 100% after 5 minutes. The installation still has 25-35 more minutes to go.
POST-INSTALLATION STEPS IN OBIEE
- Once the Windows Server has rebooted and time has been given for the server to restart all of the appropriate services, test the default configuration.
- Login to the local instance of OBIEE to test installation.
- URL: http://localhost/analytics
- Your results should be similar to the screen below – indicating a successful installation!
- Always test the “out of the box” installation before making customizations to ensure OBIEE was properly installed.


Comments
Post a Comment