Usage Tracking which is used to monitor the query performance and the users or group of users who was seen the dashboards or reports.
Analyzing usage details by users, groups and queries requested by the user.
The detail report of log in time and log out time, time of period used by the user in a dashboard, and query analyses.
Useful information of user’s information for billing process by enabling usage tracking.
Step by step Implementation of usage tracking
Create a schema for usage tracking (It’s not mandatory, you can use the already existed schema also).
Creating a new schema using sqlplus.
Open a command prompt, login as sys.
For example, Create username as “usertrack” and password as “usertrack”.
Grant permissions to the user.
 |
| Usage Tracking in OBIEE 11G |
Execute the SAACCT.Oracle.sql from the following location
<OBI 11g Installed Drive>\ instances \instance2 \bifoundation\ OracleBIServerComponent\ coreapplication_obis1\schema\ SAACCT.Oracle.sql
Open the SAACCT.oracle.sql in notepad and copy the sql query and run the query in oracle sql developer.
 |
| Usage Tracking in OBIEE 11G |
Check whether the table were created or not, by exploring the command “DESC S_NQ_ACCT;”
You can see the table with list of columns.
 |
| Usage Tracking in OBIEE 11G |
Go to control panel to create a ODBC connection between BI admin tool and database for newly created schema “usertrack”.
Start à control panelà Administrative tools à Microsoft ODBC Administrator
 |
| Usage Tracking in OBIEE 11G |
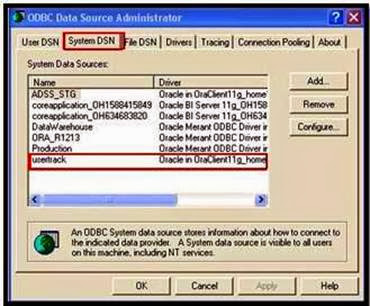
ODBC Data Source Administrator Dialogue box will open to add the DSN connectivity.
Go to system DSN tab to create an ODBC Connectivity.
 |
| Usage Tracking in OBIEE 11G |
Click on add button to add the tracking connectivity between database and admin.
A dialogue box will open to give credentials of the schema.
 |
| Usage Tracking in OBIEE 11G |
A list of drivers name will get display select the appropriate driver for the data source, here we are going to select “Oracle in oraclient11g_home1”.
According to the database installed in system the drivers may differ.
As per the dialogue box appear when click on “Oracle in oraclient11g_home1”.
 |
| Usage Tracking in OBIEE 11G |
Give configuration credentials to make the connection.
 |
| Usage Tracking in OBIEE 11G |
Data Source Name: usertrack (user defined)
Description: usertrack (user defined)
TNS Service Name: vijai (user defined According to the tns file)
User ID: usertrack
Click on test connection, to test the connection made correct or not.
 |
| Usage Tracking in OBIEE 11G |
After click on the test connection, give the password credentials for the schema we created.
 |
| Usage Tracking in OBIEE 11G |
Once the connection successful click ok.
 |
| Usage Tracking in OBIEE 11G |
You can see the “usertrack” will be added in the system DSN list.
 |
| Usage Tracking in OBIEE 11G |
Open the BI Admin Tool in online/offline mode,
 |
| Usage Tracking in OBIEE 11G |
Click on file and choose the option Import à from Database
 |
| Usage Tracking in OBIEE 11G |
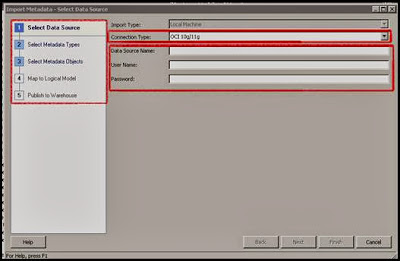
Select Data source which we are going to import, choosing here as “OCI 11g/10g”
 |
| Usage Tracking in OBIEE 11G |
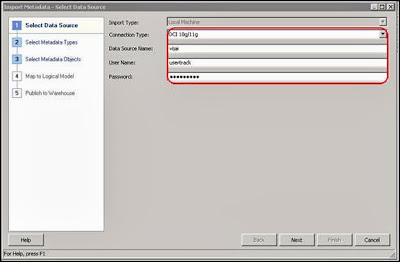
Change the connection type to OCI 11g/10 by drop down in the connection type.
Give the credentials,
TNS Name: vijai
User Name: usertrack
Password: usertrack
 |
| Usage Tracking in OBIEE 11G |
Click ok.
An import of the table dialogue box will open, select the appropriate table and import and give the credentials for connection pool.
 |
| Usage Tracking in OBIEE 11G |
Select the tracking table under that check the tables…
Click import
Give the connection pool name and the schema name and password.
Importing the data from data view to repository view.
 |
| Usage Tracking in OBIEE 11G |
Connection Pool Name: tracking
Call Interface: OCI11g/10g
Data Source Name: vijai
User name: usertrack
Password: usertrack
Click ok.
 |
| Usage Tracking in OBIEE 11G |
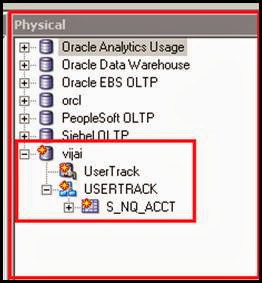
After importing check in physical layer, whether the table is imported or not.
 |
| Usage Tracking in OBIEE 11G |
Create an alias for that table with the name of Alias_S_NQ_ACCT(User Defined)
Right click on the table à select New Objectà select à Alias
 |
| Usage Tracking in OBIEE 11G |
A dialogue box will open and give the username for the alias(Alias_S_NQ_ACCT).
 |
| Usage Tracking in OBIEE 11G |
Make a Join for the original table and alias table.
Key Joining columns are user_name
 |
| Usage Tracking in OBIEE 11G |
 |
| Usage Tracking in OBIEE 11G |
Drag and Drop the tracking folder to BMM layer and also Presentation Layer.
Check the consistency and save.
 |
| Usage Tracking in OBIEE 11G |
Go to the OBIEE 11 Installed folder
<installed folder> \OBI11g \instances \instance2 \config \OracleBIServerComponent\coreapplication_obis1 \NQSConfig.INI
Edit the NQSConfig.INI file, by opening in notepad.
 |
| Usage Tracking in OBIEE 11G |
Go to the section of Usage tracking, Change the option from no to yes.
 |
| Usage Tracking in OBIEE 11G |
Change the Enable option from no to yes.
In parameters, change the physical table according to the Change made in Admin tool.
Change the connection pools also.
Change the credentials to,
Physical_table_name = “vijai”.”USERTRACK”.”S_NQ_ACCT”;
Connection_Pool = “vijai”.”UserTrack”;
Click save and close.
Then restart the services.
 |
| Usage Tracking in OBIEE 11G |
Go to sql developer and make a new connection with the user “usertrack”
Connection Name: usertrack
Username: usertrack
Password: usertrack
Hostname: local host
Port: 1521
SID: orcl
Click test connection and connect.
 |
| Usage Tracking in OBIEE 11G |
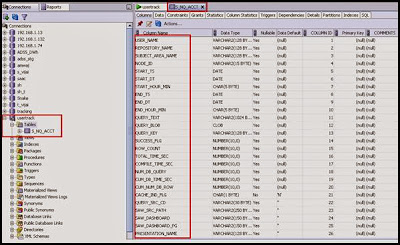
Check the Tables imported or not in the database
 |
| Usage Tracking in OBIEE 11G |
Check the data in database for the table.
 |
| Usage Tracking in OBIEE 11G |
Go to presentation side, login and view the dashboards and reports then check the database.
 |
| Usage Tracking in OBIEE 11G |
View the reports, the time and user will affect in the database.
We will get the information which user logged in and seeing what reports.
 |
| Usage Tracking in OBIEE 11G |
Excellent Demo!!
ReplyDelete