Design
View Tabs
Setup View: In the Setup view, you are able to set DAC
system properties, Informatica server connection information and physical data
source connection information for all source and target databases.


Parent
Pane Tab:
Subject Areas – The Subject Area Tab is used to create
and assemble subject areas.
Child Pane Tabs:
Edit – Define or change the name of the subject area.
Tables – Add or remove the primary fact tables
associated with the subject area.
Configuration Tags – Apply a configuration tag to a
subject area.
Tasks – View, add, remove, or inactivate tasks
associated with the subject area.

Parent
Pane Tab:
Tables – Defines source and target tables and their
respective columns.
Child
Pane Tabs:
Edit – Name the table, identify the type of table, and
indicate whether or not the table exists in the warehouse.
Related Tables – Associate related tables that will be
included in the subject area. Related tables are generally Aggregates of facts.
Columns – Define column name, order, type, and length.

Parent
Pane Tab:
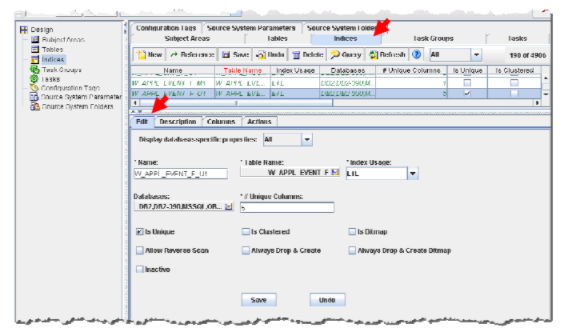
Indices – Define table indices.
Child
Pane Tabs:
Edit – Define the index name, type, associated table
and ETL creation properties.
Columns – Lists the columns in an index and the order of the columns. A database administrator (DBA) can help you determine the order of columns for an index.
Parent
Pane Tab:
Task Groups – Maintain task groups.
Child Pane Tabs:
Edit – Defines the task group execution and truncate full
and incremental load runtime properties.
Child Tasks – Lists the task associated to the task
group and order of execution.

Parent
Pane Tab:
Tasks – Create, modify, and delete tasks.
Child
Pane Tabs:
Edit – Name and edit properties of the task. Properties
include full and incremental load commands, execution type, task phase, and
connection information.
Source Tables – Lists the source tables and defines
connection information and purpose.
Target Tables – Lists target tables and defines table
analyze and truncate properties.

Parent
Pane Tab:
Tasks – Create, modify, and delete tasks.
Child Pane Tabs cont.:
Parameters – Task-specific parameters are defined.
Subject Areas (RO) – Is a read-only tab used for quick
Subject Area references.

Parent
Pane Tab:
Configuration Tags – Create, modify, and delete
configuration tags.
Child
Pane Tabs:
Edit – Names the configuration tag. “Include Task”
defines whether the task is included or excluded from the assigned subject
areas.
Subject Areas – Add and remove associated subject
areas.
Tasks – Lists the task included with the configuration
tag.

Parent
Pane Tab:
Source System Parameters– Create, modify and delete
source system parameters.
Child
Pane Tabs:
Edit – Name the parameter and specify the parameter
value. Parameters can be static text, timestamps or results issued to a
database. They are either full or incremental load specific.

Parent
Pane Tab:
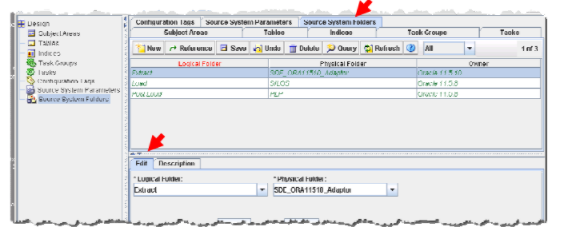
Source System Folders – Create, modify and delete relationships
between physical and logical folders.
Child
Pane Tabs:
Edit – Define the relationship between the physical and
logical folders.
Functions
of DAC Design View
1. To create tables
2. To define columns
3. To define indices
4. To create tasks
5. To create task groups
6. To build subject areas
7. To assign configuration tags to subject areas
8. To define parameters
9. To relate task logical folders to task physical
folders
To
create tables:
1.Click on the “Tables” tab.
2.Right click in the parent pane.
3.Choose Import from Database -> Import Database
Tables.

4.Select the data source you would like to import from.
5.Click on the “Read Tables” button.
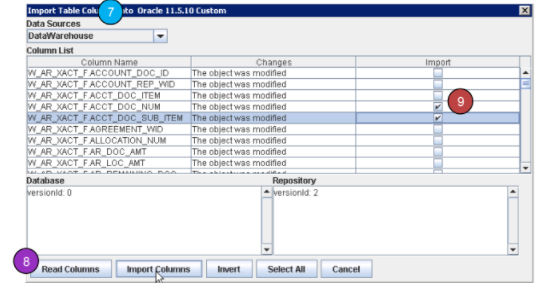
6.Check the boxes of the tables you would like to
import, and click on the “Import Tables” button.

7.After the table has been imported, in the “Edit” tab,
define table type and if the table is located in the Data Warehouse

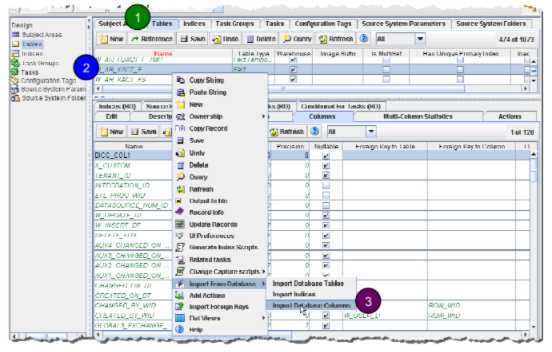
To
define columns:
Method
#1
1.Click on the “Tables” tab.
2.Right click in the parent pane.
3.Choose Import from Database -> Import Database
Columns.
Method
#2
1.Click on the “Tables” tab.
2.Select the table you would like to modify from the
list in the parent pane.
3.Click on the “Columns” tab in the child pane.
4.Click on the “New” button and enter in column name,
position, data type, length, precision, and select “Nullable”, if applicable.

5.Click on the “Tables” tab.
6.Select the table you would like to modify from the
list in the parent pane.
7.Click on the “Columns” tab in the child pane.
8.Click on the “New” button and enter in column name,
position, data type, length, precision, and select “Nullable”, if applicable.

To
define indices:
Method
#1
1.Click on the “Indices” tab.
2.Select the index you would like to modify from the
list in the parent pane.
3.Click on the “Columns” tab in the child pane.
4.Click on the “New” button and enter in column name,
position, and sort order.

Method
#2
1.Click on the “Tables” tab.
2.Right click in the parent pane.
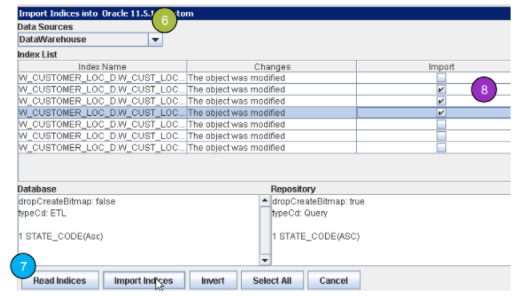
3.Choose Import from Database -> Import Indices.

4.Select desired operation.
5.Click “OK”.
6.Select the data source you would like to import from.
7.Click on the “Read Indices” button.
8.Check the boxes of the indices you would like to
import, and click on the “Import Indices” button.

To
create tasks:
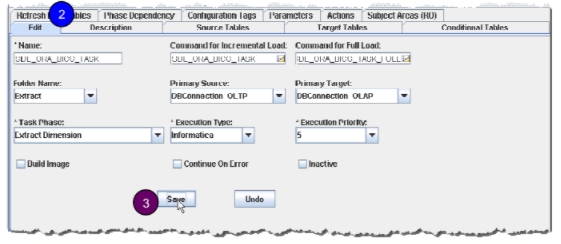
1.In the parent pane, click on the “Tasks” tab. Click on the “New” button.
2.In the child pane, click on the “Edit” tab. Enter in name,
command incremental load, command full load, folder name, primary source,
primary target, task phase and execution type.
3.Click “Save”.
Name
• The first part the name will identify the task as “SDE,”
“SIL,” or “PLP.”
• The second part of the name will identify the source
system.
• “ORA” – Oracle EBS
• “JDE” – JD Edwards
• “Universal” – Universal Adaptor
• The third part of the name will be the common name
for the target table.
• Example – “SDE_ORA_CustomerLocationDimension”
Primary
Source:
This will be the same as the source connection
information for the workflow.
Primary Target: This will be the same as the target
connection information for the workflow.
Task Phase: You determine this by deciding when you
would like the task to be executed.
Execution Type: You determine this by identifying where
you created the workflow
4.In the child pane, click on the “Source Tables” Tab.
5.Click on the “Add/Remove” button. Highlight the
source tables that are associated with your task, and click on the “Add”
button. Click “OK”.

6.Select the correct type and data source by double
clicking on the cell and choosing from the dropdown menu.

7.In the child pane, click on the “Target Tables” Tab.
8.Click on the “Add/Remove” button. Highlight the
target tables that are associated with your task, and click on the “Add”
button. Click “OK”.

9.Select the correct data source by double clicking on
the cell and choosing from the dropdown menu. Also, check the truncate and
analyze boxes, if applicable.

10.In the child pane, click on the “Parameters” Tab.

To
create task groups:
1.Select the “Task Groups” tab in the parent pane.
2.In the parent pane, click on the new button.
3.In the “Edit” tab, title the task group and check any
boxes that are applicable to your task group.

4.Choose the “Child Tasks” tab.
5.Click on the “Add/Remove” button in the child pane.
6.Add/remove the tasks that you would like to include
in your task group.
7.Click “OK”.

8.Define the dependency order.

To
build subject areas:
1.Click on the “Subject Area” tab in the parent pane.
2.In the parent pane, click on the “New” button.
3.In the “Edit” tab, name your subject area. Click
“Save”.
4.In the “Tables” tab, click on “Add/Remove”. Add or
remove the table target fact table.

5.Click the “Assemble” button in the parent pane to
create the subject area.
To
assign configuration tags subject areas:
1.Select “Configuration Tags” tab in the parent pane.
2.Highlight the configuration tag you would like to
apply to your subject area.
3.Click on the “Subject Area” tab in the child pane.
4.Click on the “Add/Remove” button. Add the subject
areas that you would like the configuration tag applied to. Click “OK”.

To
define parameters:
1.Select “Source System Parameters” from the parent
pane.
2.Highlight the parameter you want to define or modify.
3.In the “Edit” tab, select the value edit box to open
pop-up.

4.Click “OK”

To relate task logical folders to task
physical folders:
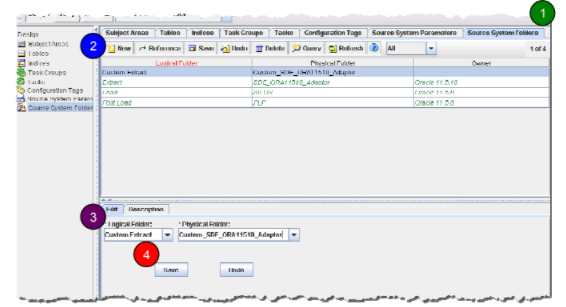
1.Select “Source System Folder” from
the parent tab.
2.Click on the “New” button to create a
new folder.
3.In the child pane, click on the
“Edit” button.
4.From the logical folder drop-down, choose the type of folder you would like to create. From the physical folder, choose the physical folder that you would like to connect to your logical folder..

Comments
Post a Comment